Three hours into a bath remodel, I found rot behind the shower wall that nobody could have seen from the outside. The bid I’d written didn’t account for it. That job still turned a profit — because I built contingency in from the start. The contractor who taught me that lesson the hard way didn’t.
Estimating a construction job isn’t just adding up materials and slapping on a markup. It’s reading a project before you ever swing a hammer. Get it right, and you protect your margin and your reputation. Get it wrong, and you’re working for free — or worse, paying out of pocket to finish a job.
Here’s the exact process I use.
Try EstimationPro free — upload photos or voice notes from the jobsite and get a line-item estimate in minutes instead of hours.
Quick Answer
To estimate a construction job: measure the scope, build a material takeoff, apply production rates to calculate labor hours, add overhead and markup, then include a contingency buffer (10–20%). A solid estimate covers materials, labor, subcontractors, permits, equipment, and job-specific risks. Skip any of those, and you’re leaving money on the table or eating cost overruns.
Share This Infographic
Feel free to share this infographic on your website. Just copy the embed code below:
Copy this embed code:
<a href="https://estimationpro.ai/tools/blog/how-to-estimate-a-construction-job" target="_blank" rel="noopener">
<img src="https://estimationpro.ai/tools/blog/infographics/how-to-estimate-a-construction-job-infographic.png" alt="How to Estimate a Construction Job: A Contractor's Step-by-Step Process infographic by EstimationPro.AI" style="max-width:100%;height:auto" loading="lazy" />
</a>
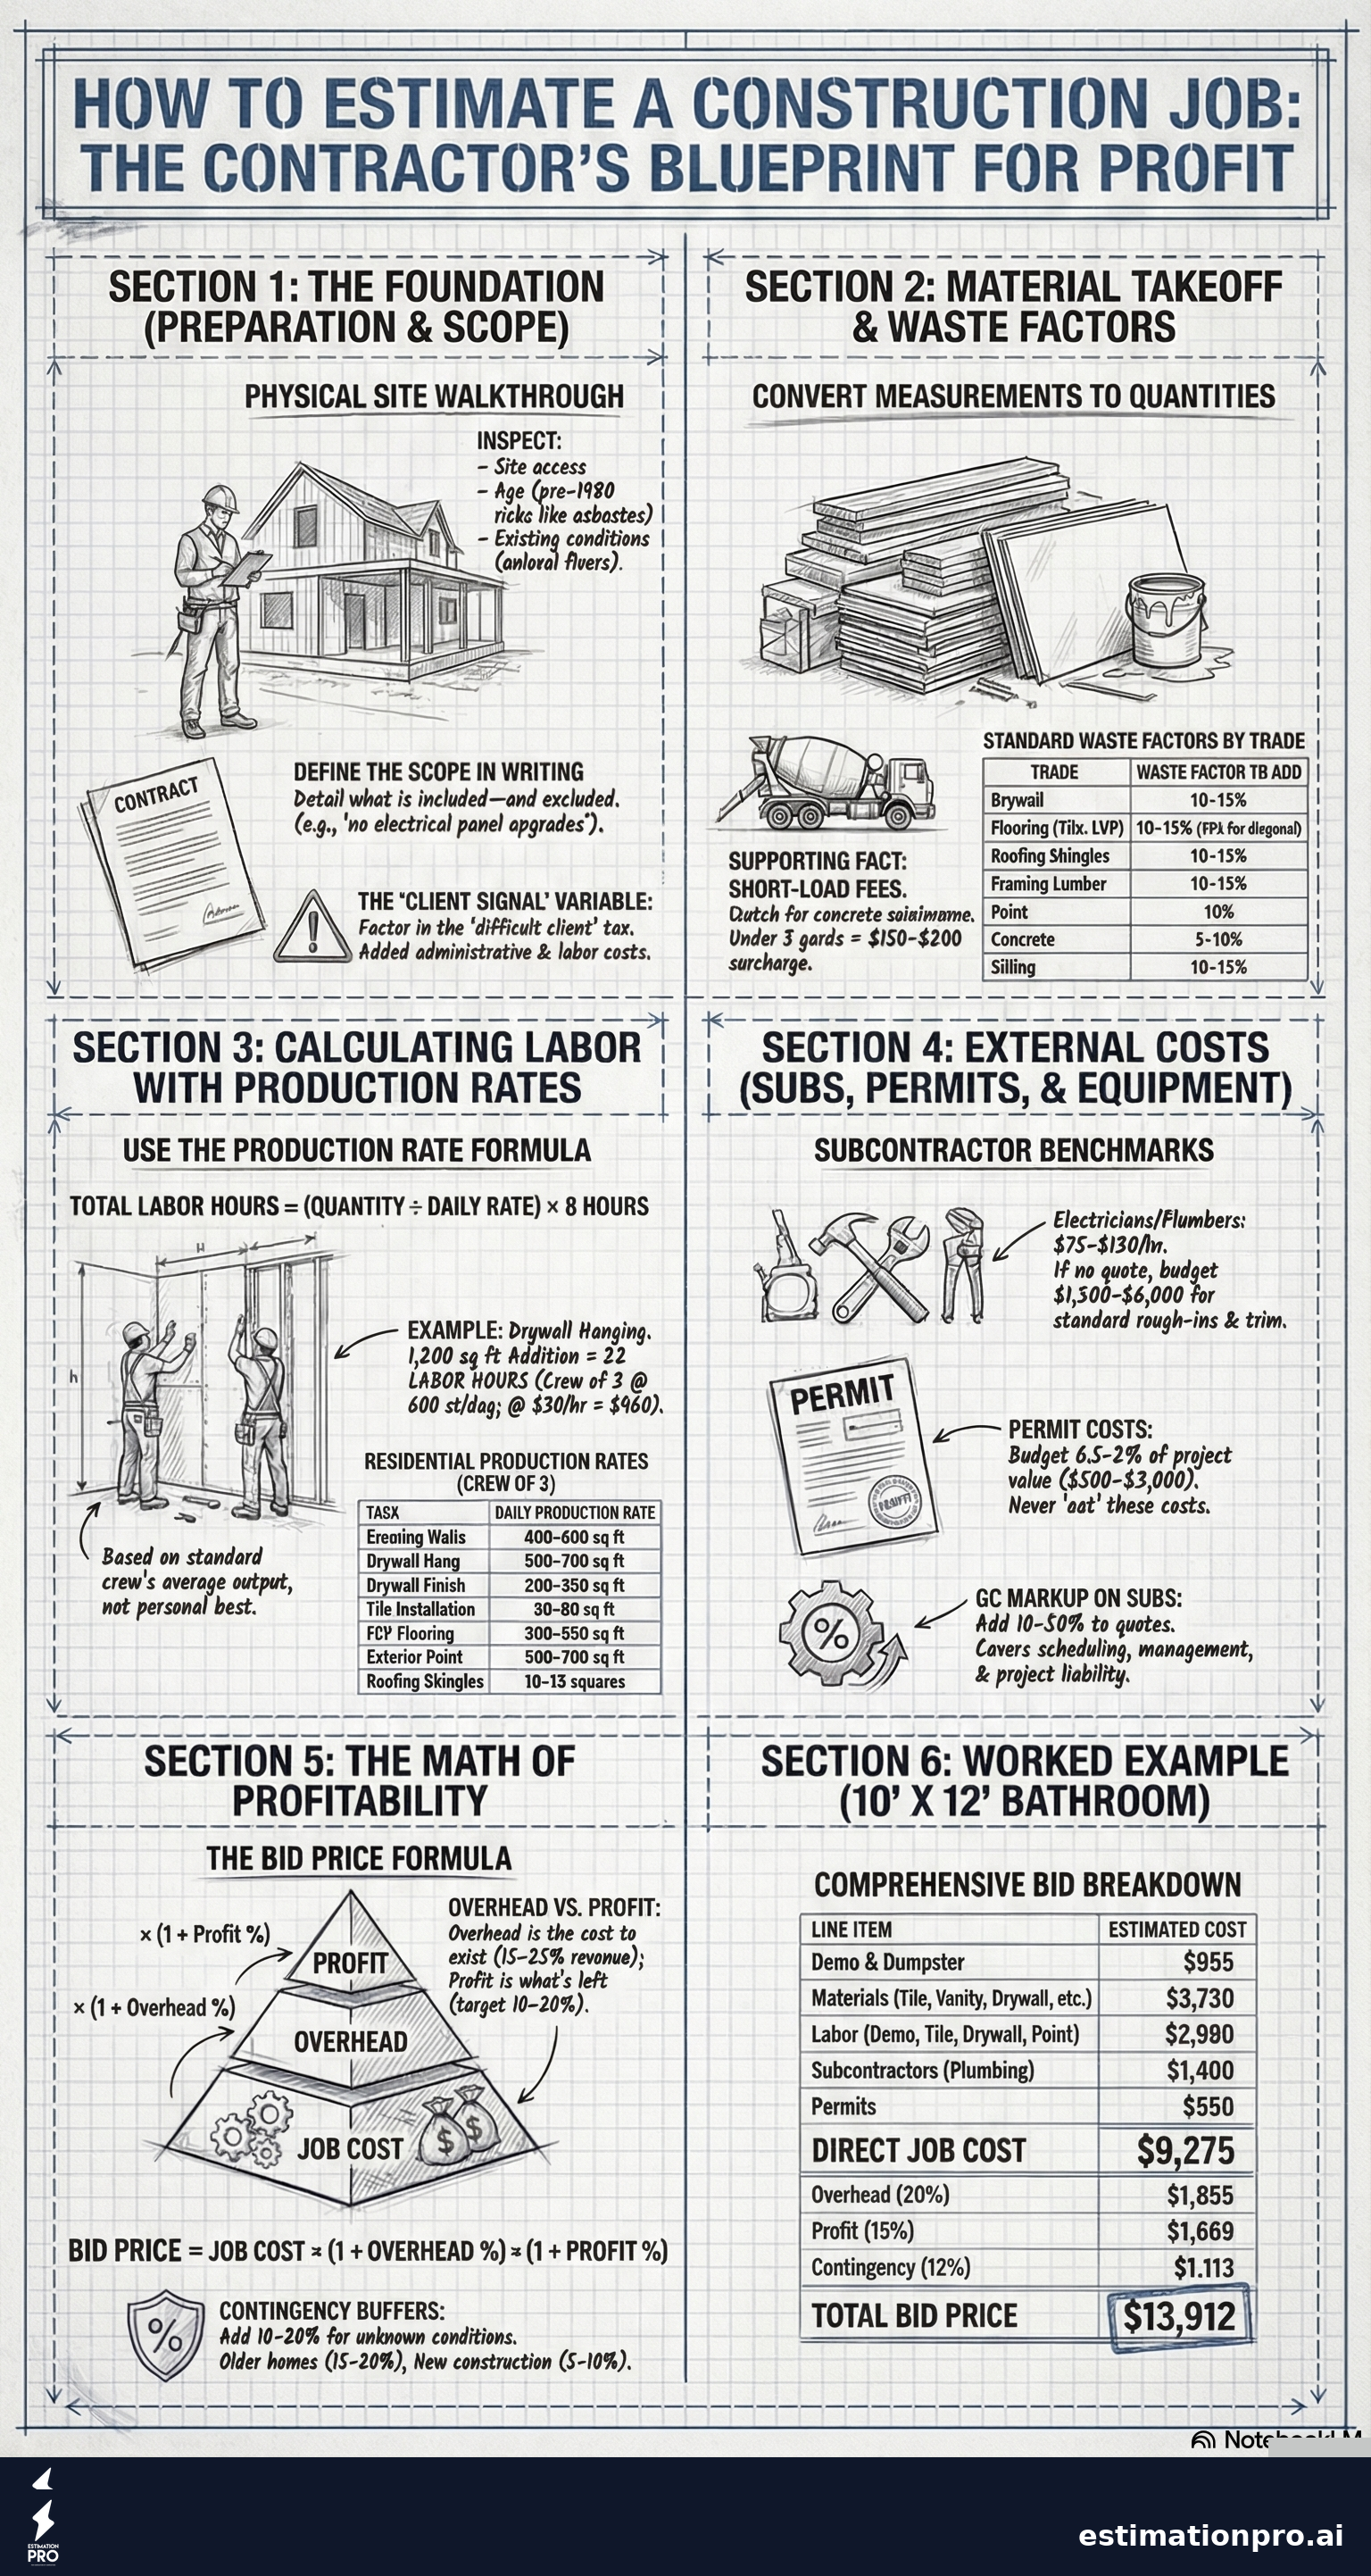
<p style="font-size:12px;color:#64748B;margin-top:8px">Source: <a href="https://estimationpro.ai/tools/blog/how-to-estimate-a-construction-job">EstimationPro.AI</a></p>Step 1: Walk the Job Before You Write Anything
Every estimate starts with eyes on the site. Photos help, but they don’t replace a physical walkthrough.
I’m looking for:
- Age of the structure. Pre-1980 homes often have surprises: knob-and-tube wiring, asbestos, substandard framing, plumbing that doesn’t meet current code.
- Access. Can a concrete truck get in? Is there a dumpster landing spot? Will materials have to be hand-carried up stairs?
- Existing conditions. Are the walls square? Is the floor level? Does the demo scope touch anything structural?
- Client signals. Is this person going to be easy to work with, or are they already arguing about every detail during the walkthrough?
That last one matters more than most contractors admit. A difficult client adds cost whether you account for it or not.
Step 2: Define the Scope of Work (In Writing)
A vague scope kills estimates. Before you build a single line item, write down exactly what’s included — and what’s not.
“Bathroom remodel” means nothing. “Remove existing tile, drywall, vanity, toilet, and shower unit; install new Schluter waterproof membrane, tile to ceiling in shower area, new vanity, toilet, and fixtures; patch and paint remaining walls; haul all demo debris” — that’s a scope.
The scope document also defines what you’re not doing. No electrical panel upgrades. No plumbing rerouting unless required by code. Exclusions protect you from scope creep that clients assume was always included.
See the scope of work guide for templates and examples.
Step 3: Material Takeoff
The takeoff is your material count. You’re converting measurements into quantities, then quantities into purchase amounts — with waste factor built in.
Waste factors by trade
| Trade | Waste Factor to Add |
|---|---|
| Drywall | 10–15% |
| Flooring (tile, LVP) | 10–15% (15% for diagonal cuts) |
| Roofing shingles | 10–15% per slope + ridge/hip |
| Framing lumber | 10–15% for cuts and defects |
| Paint | 10% for coverage variation |
| Concrete | 5–10% for forms, spills, slump |
| Siding | 10% standard, 15% complex cuts |
Never skip waste factor. You’ll make a run to the supply house mid-job and that costs labor time on top of the material.
Short-load fees: If you’re ordering concrete and the batch is under the minimum (typically 5 yards), expect a $150–$300 short-load surcharge. Build it in.
Step 4: Calculate Labor Hours Using Production Rates
This is where most new contractors get burned. They estimate hours based on how fast they work on a good day with perfect conditions. That’s not a real production rate — that’s wishful thinking.
Residential production rates (per day, experienced crew of 2)
| Task | Production Rate | Notes |
|---|---|---|
| Framing walls | 400–600 sq ft | Depends on openings, story height |
| Drywall hang | 500–700 sq ft | Flat ceilings add time |
| Drywall finish (tape/mud/sand) | 200–350 sq ft | 3-coat finish assumed |
| Tile installation | 50–80 sq ft | Intricate pattern = lower end |
| LVP flooring | 300–500 sq ft | Open plan = higher end |
| Exterior paint | 500–700 sq ft | Prep time not included |
| Roofing (install shingles) | 10–15 squares | Steep pitch = slower |
| Demo (standard interior wall) | 4–6 walls/day | Assumes no hazmat |
Sources: RSMeans 2024 Residential Cost Data; BLS occupational production data (Bureau of Labor Statistics Occupational Outlook Handbook)
Production rate formula:
Total labor hours = Quantity ÷ Daily production rate × 8 hours
Worked example — drywall hang for a 1,200 sq ft addition:
- Quantity: 1,200 sq ft
- Production rate: 600 sq ft/day (crew of 2)
- Days: 1,200 ÷ 600 = 2 days
- Labor hours: 2 days × 2 workers × 8 hours = 32 hours
- At $30/hr (carpenter rate): $960 labor
Step 5: Price Materials
Once you have quantities with waste factor, price them at current supplier costs — not last year’s memory of what lumber cost.
Material prices move. Lumber, drywall, and concrete have all swung 20–40% in a single year in recent memory. Call your supplier or pull a current quote. Pricing from 18 months ago will cost you margin.
Worked example — drywall materials for the same 1,200 sq ft:
- Net area: 1,200 sq ft ÷ 32 sq ft per sheet = 37.5 sheets → round to 38
- Plus 12% waste: 38 × 1.12 = 43 sheets
- At $18/sheet: $774 materials
- Screws, tape, mud: ~$120
- Total materials: ~$894
Step 6: Add Subcontractors and Equipment
Most remodels touch trades you don’t self-perform. Get real sub quotes — don’t assume.
If you can’t get a quote in time, use a benchmark:
| Trade | Typical Subcontract Range |
|---|---|
| Licensed electrician (panel, rough-in) | $75–$150/hr or $1,500–$5,000 project |
| Plumber (rough-in + trim) | $85–$150/hr or $2,000–$6,000 project |
| HVAC (install unit + duct) | $3,000–$8,000+ depending on system |
| Concrete crew (pour + finish slab) | $6–$12/sq ft installed |
Add your GC markup on sub costs — typically 10–20%. That’s your fee for managing the sub, handling scheduling, and holding the liability.
Equipment to line-item:
- Dumpster rental: $300–$700/week
- Scaffold (if needed): $150–$400/week
- Specialty tools (tile saw rental, etc.): quote per project
Step 7: Permits
Most homeowners don’t realize permits are required, and a lot of newer contractors forget to build them into the estimate.
Residential building permit costs typically run $500–$3,000, calculated as a percentage of the project value (usually 0.5–2%). Some jurisdictions charge a flat fee. Call the local building department and ask — it takes five minutes and saves an awkward conversation with your client when the permit invoice shows up.
Never eat permit costs. They’re a real project expense and they go in the estimate.
Step 8: Overhead and Markup
This is where a lot of contractors undervalue themselves.
Overhead is every business cost not tied to a specific project: insurance, truck payment, tools, license fees, phone, office supplies, software. Most small contractors run 15–25% overhead as a percentage of revenue (NAHB Builder Cost Survey, 2024).
Profit markup comes on top of overhead. Target 10–20% net profit on residential remodeling.
The simplest way to apply both:
Job cost × (1 + overhead rate) × (1 + profit rate) = Bid price
Example with real numbers:
- Job cost (materials + labor + subs + permits): $12,500
- Overhead rate: 20%: $12,500 × 1.20 = $15,000
- Profit rate: 15%: $15,000 × 1.15 = $17,250 bid
That $17,250 isn’t all profit. Most of it is the cost to run the business. The $2,250 profit is what’s left after you cover everything else.
For a deeper breakdown on markup vs. margin math, see overhead and profit for contractors.
Step 9: Contingency
Every job has unknowns. Hidden rot. Underslab plumbing that needs to move. A beam that’s not where the drawing shows it. Add a contingency buffer explicitly.
| Project Type | Contingency Range |
|---|---|
| New construction (clear site) | 5–10% |
| Remodel (known scope, recent build) | 10–15% |
| Remodel (older home, unknown conditions) | 15–20% |
| Historic or complex restoration | 20%+ |
I always put contingency as a visible line item in the estimate. Some contractors hide it in the markup. I prefer transparency: the client sees the line, it sets expectations, and if we don’t use it, I have the conversation about what’s left over.
Common Estimating Mistakes
1. Estimating hours based on best-case speed. Use crew averages, not your personal record pace.
2. Forgetting mobilization time. Getting the crew on-site, setting up tools, picking up materials — add 1–2 hours per day for a crew.
3. Using stale material prices. Call the supplier. Prices move.
4. Skipping the walkthrough. I’ve seen bids written off floor plans alone that were off by 30%. There’s no substitute for eyes on the site.
5. Burying profit in markup instead of tracking it. If you don’t know your actual overhead rate, you don’t know if you’re making money. Run the numbers.
6. Not defining what’s excluded. Every undefined scope item is a future argument. Write it out.
A Full Worked Example: 10x12 Bathroom Remodel
Scope: full gut demo, new tile shower, new vanity and fixtures, new flooring, patch and paint.
| Line Item | Cost |
|---|---|
| Demo labor (2 workers, 1 day) | $480 |
| Dumpster rental | $475 |
| Waterproof membrane + shower tile materials | $1,850 |
| Tile labor (3 days, 2 workers) | $1,440 |
| Vanity + fixtures (materials) | $1,200 |
| Plumbing sub (trim + rough-in adjustment) | $1,400 |
| Drywall materials + labor | $680 |
| LVP flooring (materials + labor) | $720 |
| Paint (materials + labor) | $380 |
| Permits | $650 |
| Direct job cost | $9,275 |
| Overhead (20%) | $1,855 |
| Profit (15%) | $1,669 |
| Contingency (12%) | $1,113 |
| Total bid | $13,912 |
Round to $13,900. Present it with the full line-item breakdown so the client understands what they’re paying for.
That’s not a cheap bathroom. But a 10x12 gut remodel done right — with a licensed plumber and real waterproofing — should not be cheap.
FAQ
How long does it take to write a construction estimate? A thorough residential remodel estimate takes 2–6 hours manually. That includes the site walk, takeoff, pricing calls, and building the document. Software that handles the takeoff and pricing lookup cuts that to under an hour.
What’s the difference between an estimate and a bid? An estimate is a rough projection, often given before full scope is defined. A bid is a firm price you’re committed to — or should be — based on complete information. Don’t confuse the two in client communication. See estimate vs. bid for a full breakdown.
Should I use cost-per-square-foot estimates? Only as a sanity check, not a primary method. Square footage rates are too blunt for anything beyond ballpark conversations. They ignore site conditions, finish level, and actual scope. I’ve seen two “identical” 1,200 sq ft remodels differ by $40,000 because of what was behind the walls.
How do I handle jobs where I don’t know all the costs yet? Separate what you know from what you don’t. Price the known scope firmly, then add a T&M (time and materials) allowance for the unknown portions. Define exactly what triggers additional cost. Put it in writing before work starts.
What’s a realistic profit margin for a small remodeling contractor? NAHB research consistently shows 8–12% net profit for residential remodeling contractors who track their numbers. Many contractors think they’re making more because they don’t track overhead. If you’re not measuring it, you don’t actually know.
Stop Spending Evenings on Estimates
A well-built estimate protects your profit and sets client expectations before the first nail goes in. But writing them by hand — hunting down material prices, calculating labor hours, building the document from scratch — takes time you don’t have.
EstimationPro handles the heavy lifting: upload photos or voice notes from your site walk, and it builds a line-item estimate with current pricing, production rates, and room to customize. You review, adjust, and send. Proposals, automated follow-up sequences, and invoicing are all built in — so you’re not chasing paper after the bid goes out.
Get the first estimate free and see what your evenings look like when you’re not buried in spreadsheets.
Get Free Estimating Tips
Enter your email and we'll send you pro tips, cost data, and useful resources for contractors.
We'll send helpful resources and occasional tips. Unsubscribe anytime.
 EstimationPro AI For Contractors, By Contractors
 Create Detailed Estimates in Minutes, Not Hours
Upload photos, record voice notes, and get AI-powered estimates with line items, material lists, and regional pricing.